When I first discovered Dutch babies, I was mesmerized by their dramatic puff and golden-brown appearance. These oven-baked pancakes, also known as German pancakes or puffy pancakes, have become my go-to recipe for impressing weekend guests. Today, I’m sharing my favorite variation featuring tangy lemon curd and fresh blueberries—a combination that transforms this simple dish into an extraordinary breakfast experience.
What Exactly Is a Dutch Baby?
A Dutch baby is a large, oven-baked pancake that puffs dramatically during cooking, creating crispy edges and a custard-like center. Despite its name, this dish originated in America, specifically at Manny’s Cafe in Seattle during the early 1900s. The restaurant’s owner coined the term “Dutch baby” as a variation of “Deutsch baby,” referring to the German-style pancakes.
The magic happens when the batter meets the hot, buttered skillet in a preheated oven. The high heat causes rapid steam formation, creating the signature puff that makes Dutch babies so visually striking. Within minutes, you’ll witness your humble batter transform into a golden, billowing masterpiece.
Essential Equipment and Ingredients
Equipment Needed
Cast Iron Skillet: My preferred choice is a 10-12 inch cast iron skillet. The heavy material retains heat beautifully and creates those coveted crispy edges.
Blender or Whisk: A blender ensures the smoothest batter, though vigorous whisking works perfectly fine.
Measuring Tools: Accurate measurements matter for achieving the perfect texture.
Oven Mitts: Essential for handling the extremely hot skillet.
Core Ingredients Breakdown
| Ingredient | Amount | Purpose | Quality Tips |
|---|---|---|---|
| Large Eggs | 6 | Provides structure and lift | Room temperature eggs blend easier |
| Whole Milk | 1 cup | Creates custard-like texture | Full-fat milk yields richer results |
| All-Purpose Flour | 1 cup | Forms the pancake base | Sift for lighter texture |
| Salt | 1/2 teaspoon | Enhances overall flavor | Fine sea salt preferred |
| Vanilla Extract | 1 teaspoon | Adds aromatic depth | Pure vanilla, not imitation |
| Unsalted Butter | 4 tablespoons | Creates crispy bottom and sides | European-style butter recommended |
| Fresh Blueberries | 1 1/2 cups | Sweet-tart contrast | Smaller berries work best |
Lemon Curd Ingredients
| Ingredient | Amount | Purpose | Selection Tips |
|---|---|---|---|
| Fresh Lemon Juice | 1/3 cup | Provides tangy base | Use 3-4 medium lemons |
| Lemon Zest | 2 tablespoons | Intensifies citrus flavor | Organic lemons preferred |
| Granulated Sugar | 1/2 cup | Sweetens and thickens | Fine granulated works best |
| Large Eggs | 3 whole + 2 yolks | Creates creamy texture | Farm-fresh eggs ideal |
| Unsalted Butter | 6 tablespoons | Adds richness and sheen | Cut into small cubes |
| Pinch of Salt | 1/8 teaspoon | Balances sweetness |
Creating Perfect Lemon Curd from Scratch
Making lemon curd might seem intimidating, but I’ve found it’s actually quite forgiving once you understand the process. The key lies in gentle heat and constant stirring.
Step-by-Step Lemon Curd Method
- Prepare Your Workspace: Set up a fine-mesh strainer over a bowl. Have your butter cubes ready at room temperature.
- Combine Wet Ingredients: In a heavy-bottomed saucepan, whisk together lemon juice, zest, and sugar until well combined.
- Add Eggs Gradually: Whisk the whole eggs and egg yolks in a separate bowl, then slowly stream them into the lemon mixture while whisking constantly.
- Cook with Patience: Place the saucepan over medium-low heat. Stir continuously with a whisk or wooden spoon, making sure to scrape the bottom and corners of the pan.
- Watch for Thickening: The curd is ready when it coats the back of a spoon and reaches 170°F on an instant-read thermometer. This typically takes 8-12 minutes.
- Strain and Finish: Immediately strain the curd through your prepared strainer to remove any lumps. Whisk in the butter cubes one at a time until completely smooth.
- Cool Properly: Press plastic wrap directly onto the surface to prevent a skin from forming. Refrigerate for at least 2 hours.
Mastering the Dutch Baby Technique
The Dutch baby technique requires precise timing and temperature control. I’ve learned that success comes from having everything ready before you start, as the process moves quickly once the batter hits the hot pan.
Preparation Phase
Start by positioning your oven rack in the lower third and preheating to 425°F. This positioning prevents the top from browning too quickly while ensuring the bottom cooks through completely.
Room temperature ingredients blend more easily and create a smoother batter. I typically remove eggs and milk from the refrigerator 30 minutes before cooking. If you’re short on time, place eggs in warm water for 10 minutes and microwave the milk for 20-30 seconds.
Batter Creation Process
The batter comes together in mere minutes, but the order of operations matters significantly. I always start with the eggs, whisking them until they’re completely smooth and slightly frothy. This creates the foundation for the pancake’s custard-like interior.
Next, I gradually add the milk while whisking continuously. The goal is complete incorporation without creating excessive foam. Slowly sift in the flour, whisking just until smooth. Overmixing develops gluten, which can make the Dutch baby tough rather than tender.
Finally, I add vanilla and salt, giving the batter one final gentle stir. The consistency should resemble heavy cream—pourable but with some body.
The Critical Heating Phase
This step separates successful Dutch babies from disappointing ones. Place your butter in the cast iron skillet and put it in the preheated oven. The butter should melt and begin sizzling within 2-3 minutes.
When the butter starts turning golden brown and smells nutty, it’s time to act quickly. Remove the skillet (carefully—it’s extremely hot) and immediately pour in the batter. You should hear an aggressive sizzling sound as the batter hits the hot fat.
Return the skillet to the oven immediately. Don’t open the oven door for the first 20 minutes—the temperature drop can cause the Dutch baby to collapse prematurely.
Timing and Temperature Guidelines
| Phase | Time | Temperature | Visual Cues |
|---|---|---|---|
| Preheat Oven | 15 minutes | 425°F | Fully heated |
| Butter Melting | 2-3 minutes | 425°F | Golden, sizzling |
| Initial Baking | 20 minutes | 425°F | No peeking! |
| Final Baking | 5-10 minutes | 425°F | Golden brown, puffy |
| Total Cook Time | 25-30 minutes | 425°F | Sides pulling away |
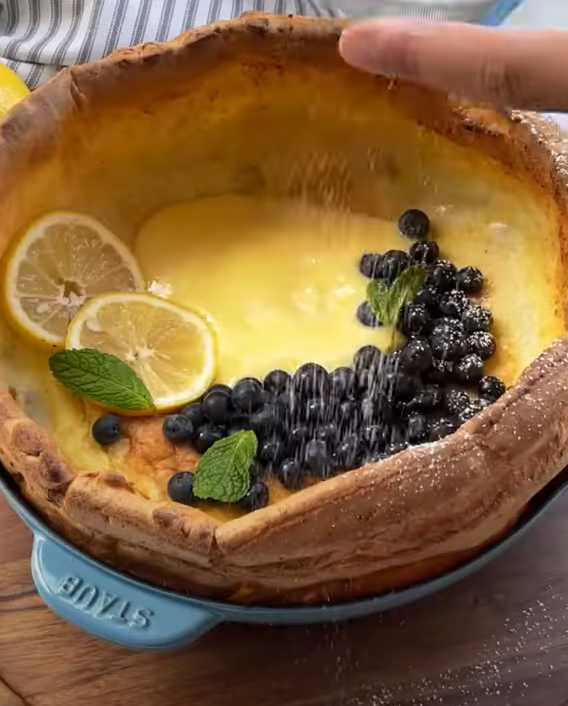
Assembly and Presentation Techniques
The presentation phase happens quickly since Dutch babies deflate as they cool. I have my lemon curd at room temperature and blueberries washed and dried before the pancake comes out of the oven.
Immediate Assembly Steps
- Quick Photo: If you want to capture the full puff, take photos immediately—you have about 2-3 minutes before deflation begins.
- Dollop the Curd: Using a large spoon, place generous dollops of lemon curd across the surface while the Dutch baby is still dramatically puffed.
- Scatter Blueberries: Distribute fresh blueberries evenly, allowing some to nestle into the curd and others to sit on the pancake surface.
- Optional Garnishes: A light dusting of powdered sugar or fresh mint leaves adds visual appeal.
Nutritional Profile and Health Benefits
Understanding the nutritional aspects helps me make informed decisions about portion sizes and frequency of serving this indulgent breakfast.
Complete Nutritional Breakdown (Per Serving, Recipe Serves 6)
| Nutrient | Amount | % Daily Value | Health Notes |
|---|---|---|---|
| Calories | 385 | 19% | Moderate breakfast portion |
| Total Fat | 18g | 28% | Primarily from eggs and butter |
| Saturated Fat | 10g | 50% | Rich breakfast treat |
| Cholesterol | 245mg | 82% | High due to eggs |
| Sodium | 285mg | 12% | Moderate sodium content |
| Carbohydrates | 45g | 15% | From flour and fruit |
| Dietary Fiber | 2g | 8% | Blueberries contribute fiber |
| Sugars | 28g | – | Natural and added sugars |
| Protein | 12g | 24% | Excellent protein source |
| Vitamin C | 15mg | 17% | From lemon and blueberries |
| Calcium | 125mg | 13% | From milk and eggs |
| Iron | 2.1mg | 12% | From eggs and flour |
Health Benefits Analysis
Protein Power: The combination of eggs and milk provides complete proteins containing all essential amino acids. This helps maintain satiety and supports muscle health.
Antioxidant Boost: Blueberries deliver anthocyanins, powerful antioxidants that support brain health and may help reduce inflammation. The vitamin C from lemons aids iron absorption and immune function.
Energy Balance: While this dish is calorie-dense, it provides sustained energy from the protein and complex carbohydrates, making it suitable for active weekend mornings.
Troubleshooting Common Issues
Through years of making Dutch babies, I’ve encountered and solved numerous problems. Here are the most frequent issues and my proven solutions.
Problem: Dutch Baby Doesn’t Puff
Causes and Solutions:
- Cold Ingredients: Ensure eggs and milk reach room temperature before mixing
- Insufficient Heat: Verify oven temperature with a thermometer; some ovens run cool
- Old Eggs: Fresh eggs provide better lift and structure
- Overmixed Batter: Mix just until smooth to avoid tough texture
Problem: Uneven Browning
Causes and Solutions:
- Hot Spots: Rotate the skillet halfway through cooking if your oven has uneven heating
- Wrong Rack Position: Use the lower third of the oven for even cooking
- Thin Spots: Ensure batter is evenly distributed when pouring
Problem: Soggy Bottom
Causes and Solutions:
- Insufficient Preheating: Make sure the skillet and butter are properly heated
- Too Much Batter: Use measurements precisely; excess batter won’t cook through
- Low Oven Temperature: Verify your oven reaches and maintains 425°F
Creative Variations and Seasonal Adaptations
Once you master the basic technique, Dutch babies become a canvas for creativity. I love adapting this recipe throughout the year using seasonal ingredients.
Spring Variations
- Strawberry Rhubarb: Replace blueberries with diced strawberries and rhubarb
- Lemon Ricotta: Add ricotta dollops alongside the lemon curd for extra creaminess
- Fresh Herb: Incorporate chopped mint or basil for an unexpected twist
Summer Adaptations
- Mixed Berry: Combine blueberries, raspberries, and blackberries
- Peach Vanilla: Use sliced peaches with vanilla bean paste in the batter
- Lavender Honey: Add culinary lavender to the batter and drizzle with honey
Fall Inspirations
- Apple Cinnamon: Sautéed apple slices with cinnamon instead of berries
- Pear Ginger: Poached pears with crystallized ginger pieces
- Pumpkin Spice: Add pumpkin puree and warm spices to the batter
Winter Comforts
- Cranberry Orange: Tart cranberries with orange curd instead of lemon
- Chocolate Cherry: Cocoa powder in batter with fresh or dried cherries
- Spiced Pear: Warm spices with caramelized pears
Storage and Reheating Guidelines
While Dutch babies are best enjoyed immediately, I’ve developed methods for storing and reheating when necessary.
Optimal Storage Methods
Refrigeration: Store covered Dutch baby pieces for up to 3 days. The texture changes but remains enjoyable.
Freezing: Cut into wedges and freeze for up to 1 month. Wrap individually in plastic wrap, then place in freezer bags.
Lemon Curd Storage: Homemade lemon curd keeps for 1 week refrigerated or 3 months frozen.
Reheating Techniques
Oven Method: Reheat at 350°F for 5-8 minutes until warmed through. This preserves texture better than microwaving.
Toaster Oven: Individual pieces reheat well in a toaster oven at 350°F for 3-4 minutes.
Skillet Method: Heat pieces in a lightly buttered skillet over medium-low heat for 2-3 minutes per side.
Serving Suggestions and Accompaniments
I’ve discovered that thoughtful accompaniments can elevate this dish from delicious to extraordinary. The key is balancing the rich, sweet flavors with complementary textures and tastes.
Perfect Beverage Pairings
Coffee Options: A medium roast coffee with bright acidity complements the lemon curd beautifully. Cold brew with a splash of cream provides a smooth contrast to the pancake’s richness.
Tea Selections: Earl Grey’s bergamot notes harmonize with lemon, while chamomile tea offers a soothing contrast. Green tea provides a clean palate cleanser.
Fresh Juices: Freshly squeezed orange juice adds vitamin C and bright acidity. Sparkling water with lemon maintains the citrus theme while cleansing the palate.
Protein Additions
While the Dutch baby provides substantial protein from eggs, some guests appreciate additional options:
Turkey Sausage: Lean turkey sausage links provide savory contrast without overwhelming richness.
Canadian Bacon: Thinly sliced Canadian bacon offers smoky flavor and lean protein.
Greek Yogurt: A dollop of plain Greek yogurt adds probiotics and tangy flavor while boosting protein content.
Textural Contrasts
Toasted Nuts: Sliced almonds or chopped pecans add delightful crunch and healthy fats.
Granola: A small sprinkle of low-sugar granola provides texture variation.
Coconut Flakes: Lightly toasted coconut flakes complement the fruit flavors while adding tropical notes.
Frequently Asked Questions
Q: Can I make the batter ahead of time? I don’t recommend making the batter more than 30 minutes in advance. The leavening action works best when the batter goes directly from mixing bowl to hot skillet. However, you can measure out all dry and wet ingredients separately the night before for quicker assembly.
Q: What if I don’t have a cast iron skillet? While cast iron produces the best results, you can use a heavy oven-safe skillet or even a 9×13 inch baking dish. Increase the cooking time by 5-10 minutes if using a baking dish, and expect less dramatic puffing.
Q: How do I know when the Dutch baby is done? The Dutch baby is ready when the edges are deep golden brown and pulling away from the sides of the pan. The center should be set but still slightly jiggly. If you have an instant-read thermometer, the internal temperature should reach 200°F.
Q: Can I use frozen blueberries instead of fresh? Yes, but don’t thaw them first. Frozen blueberries will release more juice during cooking, which can make the bottom slightly soggy. I prefer fresh for optimal texture, but frozen works in a pinch.
Q: Is it possible to make individual Dutch babies? Absolutely! Use a 6-cup muffin tin or individual cast iron skillets. Reduce the cooking time to 12-15 minutes and divide the batter evenly. Each serving will be smaller but perfect for portion control.
Q: What’s the secret to getting maximum puff? The key factors are: room temperature ingredients, properly heated skillet and butter, correct oven temperature, and absolutely no peeking during the first 20 minutes of baking. The steam created by the hot skillet is what creates the dramatic rise.
Q: Can I make this recipe gluten-free? Yes, substitute the all-purpose flour with a 1:1 gluten-free flour blend that contains xanthan gum. The texture will be slightly different but still delicious. I’ve had success with King Arthur Gluten-Free Flour.
Q: How long does homemade lemon curd last? Properly stored homemade lemon curd keeps for 7-10 days in the refrigerator. Make sure to press plastic wrap directly onto the surface to prevent a skin from forming. You can also freeze it for up to 3 months.
Q: What should I do if my lemon curd curdles? If your lemon curd curdles during cooking, remove it from heat immediately and strain it through a fine-mesh strainer. Then whisk in the butter while it’s still warm. The butter often helps smooth out minor curdling. Prevention is key—use low heat and stir constantly.
Q: Can I double this recipe for a larger crowd? This recipe works best as written for 4-6 people. For larger groups, I recommend making multiple Dutch babies rather than doubling the recipe in one pan. The batter won’t cook evenly in larger quantities, and you’ll lose the characteristic puff.
This Dutch baby with lemon curd and blueberries represents the perfect marriage of technique and flavor. The dramatic presentation never fails to impress guests, while the combination of tangy lemon curd and sweet blueberries creates a memorable breakfast experience. Master this recipe, and you’ll have a reliable showstopper for every special occasion.
The beauty of Dutch babies lies not just in their visual impact, but in their versatility and relative simplicity. Once you understand the basic technique, you can adapt the recipe to showcase seasonal fruits, experiment with different flavor profiles, and create your own signature variations.
Remember that practice makes perfect with Dutch babies. Don’t be discouraged if your first attempt doesn’t achieve maximum puff—even a slightly deflated Dutch baby tastes absolutely delicious. Focus on getting the timing right, maintain your oven temperature, and most importantly, enjoy the process of creating something truly special for the people you care about.