Have you ever walked into a bakery, inhaled that heavenly aroma of freshly baked bread, and wished you could recreate that magic at home? For years, I convinced myself that artisan bread making was reserved for professional bakers or dedicated hobbyists with special equipment and years of experience. Boy, was I wrong!
Today I’m sharing what might just change your life (at least your bread life): the simplest, most foolproof crusty bread recipe you’ll ever try. This no-knead method produces a bakery-quality loaf with a crackling crust and tender, airy interior that will make you feel like a professional baker—without any of the fuss.
The beauty of this recipe lies in its simplicity. Time does all the hard work for you—no kneading, no special techniques, no fancy equipment required. Just mix, wait, shape, and bake. That’s it!
Why This No-Knead Bread Recipe Works
Traditional bread making often involves extensive kneading to develop gluten, the protein network that gives bread its structure. The genius of this no-knead method is that it replaces physical kneading with time. A long, slow fermentation allows gluten to develop naturally, resulting in bread with an amazing texture and depth of flavor.
What makes this recipe truly special:
- Minimal hands-on time – Just 5-10 minutes of actual work
- Incredible texture – Crispy crust with a tender, airy interior
- Foolproof technique – Success even for complete beginners
- Basic ingredients – Just flour, water, salt, and yeast
- Versatile base recipe – Endless variation possibilities
- Make-ahead friendly – Prep dough up to 24 hours in advance
Essential Ingredients
| Ingredient | Amount | Notes |
|---|---|---|
| All-purpose flour | 3 cups (390g) | Bread flour works too for extra chewiness |
| Instant yeast | 1/2 teaspoon (2g) | Yes, that small amount is correct! |
| Salt | 1 1/4 teaspoons (7g) | I prefer fine sea salt |
| Water | 1 1/2 cups (345g) | Room temperature or slightly warm |
These humble ingredients transform into something magical when given enough time. The tiny amount of yeast might surprise you, but that’s part of the secret—the slow fermentation develops complex flavors that rushed bread simply can’t match.
Equipment You’ll Need
While this recipe is incredibly simple, you’ll need a few basic items:
- Large mixing bowl – For mixing and rising the dough
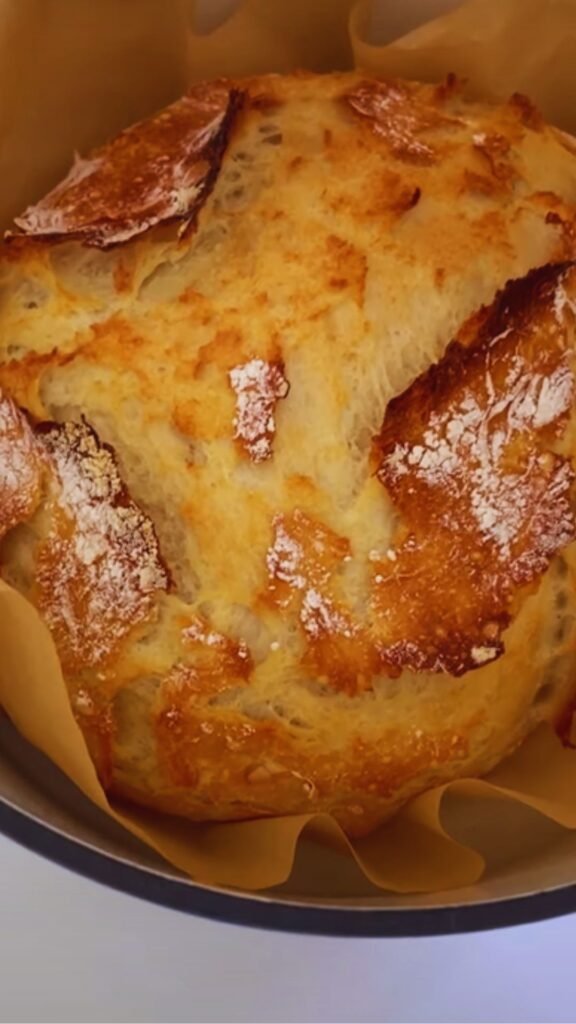
- Dutch oven or heavy covered pot – The secret to achieving that bakery-quality crust
- Parchment paper – Makes transferring the dough easier
- Kitchen towel – For covering the dough during rising
- Measuring cups and spoons – For accurate measurements
Don’t have a Dutch oven? I’ll cover alternative baking methods later, but if you enjoy baking, a Dutch oven is one of the most versatile investments you can make for your kitchen.
Step-by-Step Method
Phase 1: Mix and First Rise (18-24 hours)
- In a large bowl, whisk together the flour, yeast, and salt.
- Add water and stir with a wooden spoon or spatula until a shaggy, sticky dough forms. It will look rough and uneven—that’s perfect!
- Cover the bowl with plastic wrap or a plate and let it sit at room temperature (about 70°F/21°C) for 18-24 hours. The dough will rise, bubble, and develop flavor during this time.
The dough will look rough and sticky at first—this is exactly right! Don’t be tempted to add more flour.
Phase 2: Shape and Second Rise (1-2 hours)
- When the dough has risen and is dotted with bubbles, generously flour a work surface.
- Scrape the dough out gently with a spatula—it will be very sticky and stretchy.
- Using lightly floured hands, fold the dough onto itself once or twice to form a rough ball. Don’t knead it!
- Place the dough seam-side down on a piece of parchment paper.
- Cover loosely with a cotton towel and let rise for 1-2 hours until doubled in size.
During this phase, preheat your oven to 450°F (230°C) with a Dutch oven or heavy covered pot inside. The pot needs to be blazing hot!
Phase 3: Bake (45-50 minutes)
- When the dough is ready, carefully remove the hot pot from the oven.
- Lift the dough by the parchment and gently lower it into the pot, parchment and all.
- Cover with the lid and bake for 30 minutes.
- Remove the lid and bake for another 15-20 minutes until the bread is deep golden brown.
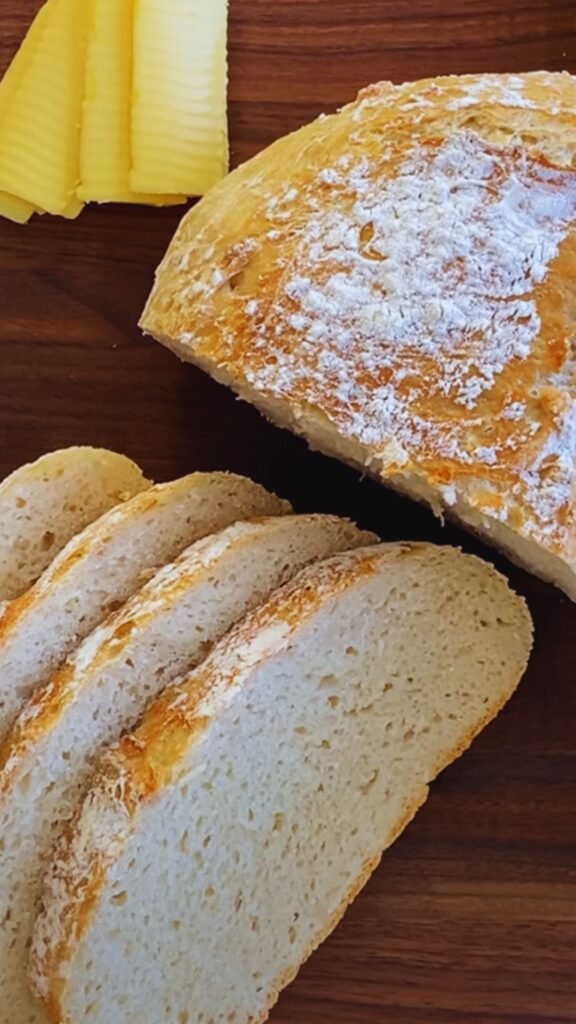
- Remove the bread and let it cool completely on a wire rack before slicing.
The hardest part of this entire recipe? Waiting for the bread to cool before slicing into it!
Troubleshooting Tips
Even with such a simple recipe, things can occasionally go wrong. Here’s how to address common issues:
| Problem | Possible Cause | Solution |
|---|---|---|
| Dough too wet | Measurement error or humidity | Add a little more flour during shaping |
| Dough too dry | Measurement error | Add a tablespoon of water during initial mixing |
| Didn’t rise enough | Old yeast or cold room | Use fresh yeast; find a warmer spot; extend rising time |
| Too dense interior | Underproofed or overproofed | Adjust rising time; ensure proper temperature |
| Pale crust | Oven not hot enough; lid removed too late | Preheat longer; remove lid earlier |
| Bottom burned | Oven too hot; pot too close to heat source | Lower oven rack; reduce temperature slightly |
Remember that bread baking is partly science and partly art. Each loaf may turn out slightly different, and that’s part of the charm of homemade bread!
Variations to Try
Once you’ve mastered the basic recipe, the possibilities for variations are endless:
Mix-ins (Add during initial mixing)
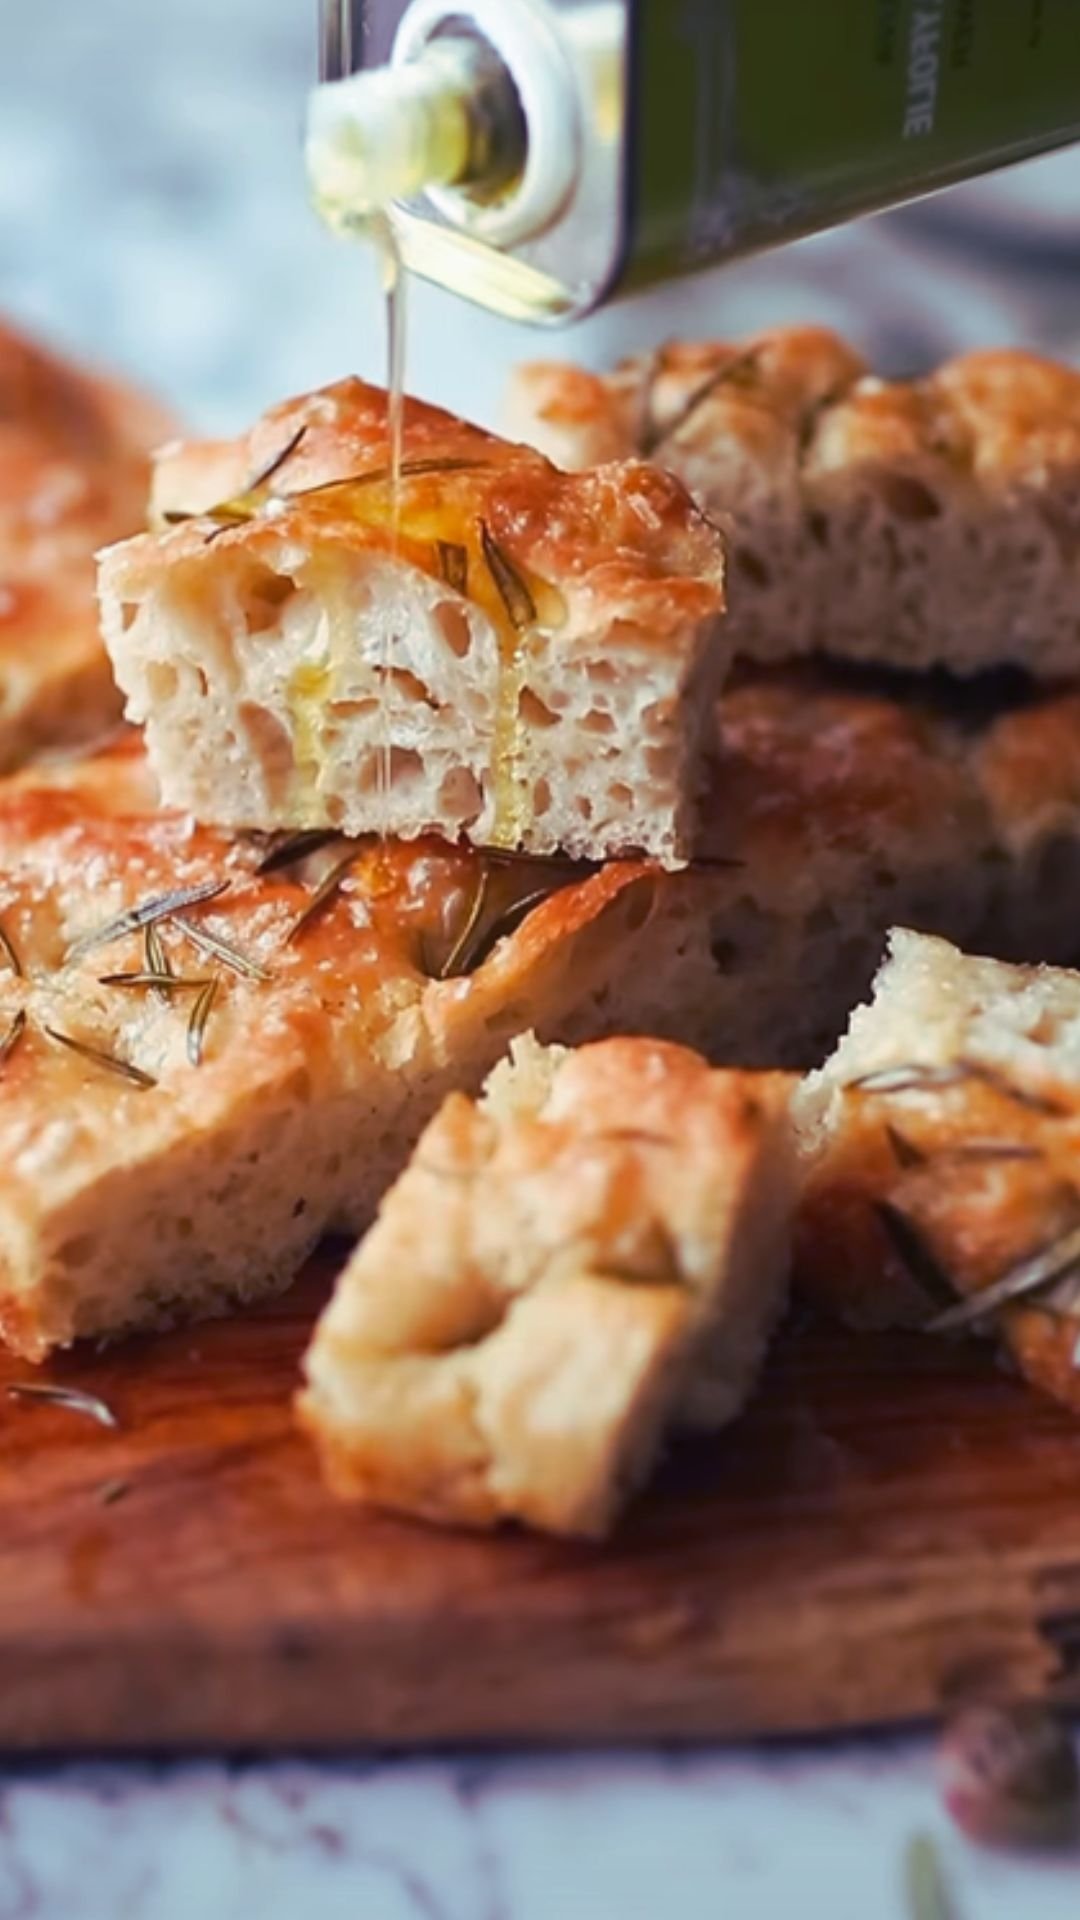
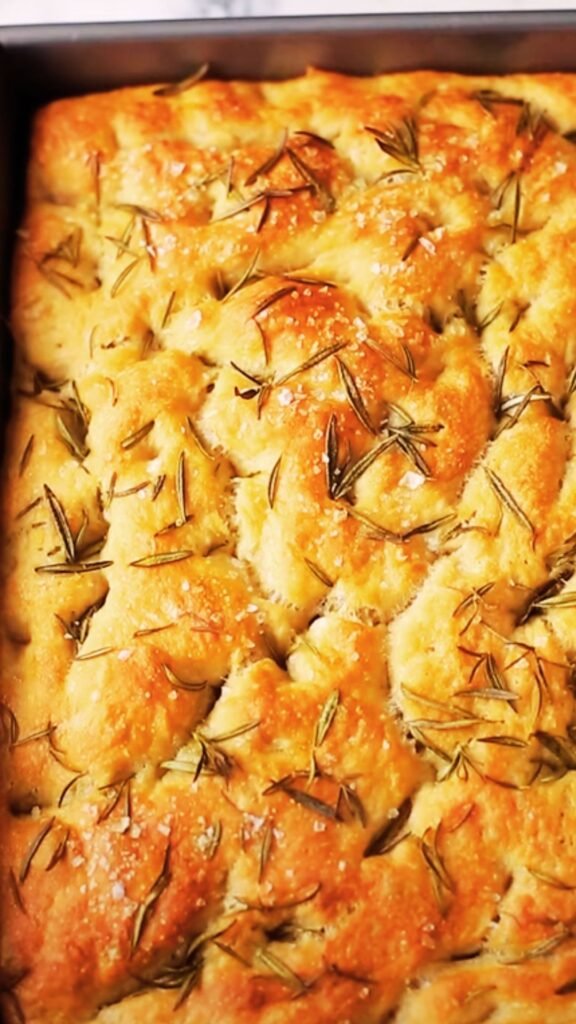
- Herb blend: 2 tablespoons mixed dried herbs (rosemary, thyme, oregano)
- Cheese: 1 cup shredded cheddar or parmesan
- Garlic: 4-6 cloves roasted garlic, mashed
- Olive: 1 cup pitted, chopped kalamata or green olives
- Walnut & raisin: 3/4 cup chopped walnuts + 3/4 cup raisins
- Seeded: 3 tablespoons mixed seeds (sunflower, pumpkin, sesame, poppy)
Surface treatments (Apply before baking)
- Brush with water and sprinkle with oats or seeds
- Dust with cornmeal or semolina for extra crunch
- Score decorative patterns with a sharp knife or razor
Flour substitutions (For more advanced bakers)
- Replace up to 1 cup of all-purpose flour with whole wheat for nuttier flavor
- Try adding 1/4 cup rye flour for complexity
- Experiment with ancient grains like spelt or einkorn (may require adjustments to water)
Storage and Serving Suggestions
This bread is at its absolute peak the day it’s baked, especially within the first few hours after cooling. The crust will gradually soften over time, but the bread remains delicious for several days.
Storage tips:
- First day: Store at room temperature in a paper bag or loosely covered with a kitchen towel.
- Days 2-3: Keep in a bread box or bag with the cut-side down on a cutting board.
- Beyond day 3: Freeze sliced bread for best quality. Toast frozen slices directly from the freezer.
Serving ideas:
- Serve warm with high-quality butter and flaky sea salt
- Use as the base for avocado toast with a sprinkle of red pepper flakes
- Pair with hearty soups or stews to soak up the delicious broth
- Create impressive sandwiches with layers of roasted vegetables and spreads
- Toast thick slices and top with ricotta and honey for a simple dessert
Reviving day-old bread:
To restore the crisp crust on older bread, sprinkle it lightly with water and heat in a 350°F (175°C) oven for 5-10 minutes.
No Dutch Oven? Try These Alternatives
While a Dutch oven creates the optimal environment—trapping steam to develop that coveted crust—you can still make excellent bread without one.
Alternative baking methods:
- Baking stone or steel + heat-proof bowl: Preheat the stone, place dough on it, and cover with a large metal bowl for the first 30 minutes.
- Baking sheet + water pan: Place a metal pan on the bottom rack while preheating. Place bread on a middle rack and pour 1 cup hot water into the bottom pan to create steam.
- Loaf pan with lid: For a sandwich-style loaf, use a covered loaf pan for the first 30 minutes, then uncover.
- Clay baker: If you have a clay baker like a Römertopf, soak it first, then use it similarly to a Dutch oven.
These methods won’t produce exactly the same results as a Dutch oven, but they can still create delicious bread with a good crust.
Why Baking Your Own Bread Matters
In our fast-paced world, there’s something profoundly satisfying about making your own bread. Beyond the obvious benefit of a kitchen filled with intoxicating aromas and the pleasure of eating warm, fresh bread, there are deeper rewards:
- Connection to tradition: Bread making connects us to thousands of years of human history
- Mindfulness practice: The process encourages patience and presence
- Control over ingredients: You know exactly what goes into your food
- Sense of accomplishment: Few kitchen achievements feel as rewarding as a successful loaf
- Cost savings: Artisan bread costs $5-8 per loaf in stores; homemade costs about $1
Each time I make this bread, I’m reminded of how simple pleasures are often the most profound. There’s real magic in transforming flour, water, salt, and yeast into something so nourishing and delicious.
Frequently Asked Questions
Q: Can I use active dry yeast instead of instant?
Yes, but you’ll need to activate it first. Dissolve the yeast in the water for 5-10 minutes until foamy, then proceed with the recipe.
Q: How do I know if my dough has risen enough during the first rise?
The dough should be about doubled in size and have a bubbly surface. It will look wet and have a slightly domed top. If your kitchen is particularly cold, it might take longer than 24 hours.
Q: My dough is too sticky to handle. What should I do?
This is a very wet dough by design. Instead of adding lots more flour (which will make the bread dense), try wetting your hands with water when handling it. A bench scraper is also helpful for moving the sticky dough.
Q: Can I make this bread with gluten-free flour?
Unfortunately, this specific no-knead method relies heavily on gluten development. For gluten-free bread, you’ll need a different recipe specifically developed for gluten-free flours.
Q: Can I refrigerate the dough to slow down the rising process?
Absolutely! After the initial mixing, you can refrigerate the dough for up to 3 days. This actually enhances flavor development. Just let it come to room temperature for the final rise before baking.
Q: Why did my bread collapse when I put it in the oven?
Your dough was likely overproofed during the second rise. Next time, shorten the second rise or test the dough by gently poking it—if the indentation springs back partially, it’s ready to bake.
Q: Can I double the recipe?
Yes, but I recommend baking two separate loaves rather than one giant loaf, as the baking dynamics change significantly with larger dough masses.
Final Thoughts
What still amazes me about this bread, even after baking it countless times, is how something so impressive can come from such a simple process. It defies the common perception that great bread requires complicated techniques or professional training.
If you’re new to bread baking, consider this recipe your gateway to a rewarding culinary journey. If you’re an experienced baker looking to simplify your routine, this might become your new go-to method.
Remember that each loaf tells a story—of the temperature in your kitchen, the age of your yeast, the humidity in the air. Embrace the slight variations as part of the handcrafted charm.
I hope this recipe brings as much joy to your kitchen as it has to mine. There’s nothing quite like the pride of setting a loaf of homemade bread on the table and saying, “I made this.” Even better when you can add, “And it was actually really easy!”
Happy baking!