There’s something incredibly satisfying about a meal that combines tender chicken, perfectly cooked potatoes, and a flavorful sauce—all prepared in a single pot. As someone who juggles work, family commitments, and the eternal question of “what’s for dinner?” I’ve come to rely on my Instant Pot for those busy weeknights when I need something delicious without the fuss.
This Instant Pot Chicken and Potatoes recipe has become a staple in my household. Not only does it save me precious time on cleanup (hello, one-pot meals!), but it also delivers restaurant-quality results with minimal effort. I’ve perfected this recipe through countless iterations, and today I’m excited to share my ultimate version with you.
Why You’ll Love This Recipe
Before we dive into the details, let me tell you why this recipe deserves a spot in your regular meal rotation:
- Time-Efficient: Ready in under 30 minutes total
- Family-Friendly: Appeals to both picky eaters and food enthusiasts
- Budget-Conscious: Uses affordable, everyday ingredients
- Customizable: Easily adapted to your flavor preferences
- Nutritionally Balanced: Provides protein, carbs, and vegetables in one dish
Ingredients You’ll Need
For this magic one-pot meal, gather these simple ingredients:
- 2 lbs boneless, skinless chicken thighs (or breasts if preferred)
- 1.5 lbs baby potatoes (red or gold work beautifully)
- 3 tablespoons olive oil, divided
- 4 cloves garlic, minced
- 1 medium onion, diced
- 1 cup chicken broth (low sodium recommended)
- 2 tablespoons butter
- 2 teaspoons Italian seasoning
- 1 teaspoon paprika (smoked paprika adds extra depth)
- 1 teaspoon garlic powder
- ½ teaspoon onion powder
- ½ teaspoon dried thyme
- ¼ teaspoon crushed red pepper flakes (optional, for heat)
- Salt and freshly ground black pepper to taste
- 2 tablespoons fresh parsley, chopped (for garnish)
- 1 tablespoon fresh lemon juice
- Optional: 1 cup baby carrots or chopped carrots
- Optional: 1 cup green beans, trimmed
Essential Equipment
While the Instant Pot does most of the heavy lifting, having these tools handy will make preparation even smoother:
- 6-quart Instant Pot (or similar electric pressure cooker)
- Sharp knife
- Cutting board
- Measuring spoons and cups
- Wooden spoon or silicone spatula
- Tongs for handling the chicken
- Instant-read meat thermometer
Step-by-Step Instructions
Preparation Phase
- Prepare the chicken: Pat the chicken thighs dry with paper towels (this helps with browning). Season generously on both sides with salt, pepper, garlic powder, and paprika.
- Prepare the potatoes: Wash baby potatoes thoroughly. If using larger ones, cut them into 1.5-inch chunks to ensure even cooking. For baby potatoes, you can leave them whole or halve them depending on size.
- Prep the aromatics: Dice onion and mince garlic. Having these ready will make the cooking process seamless.
Cooking Process
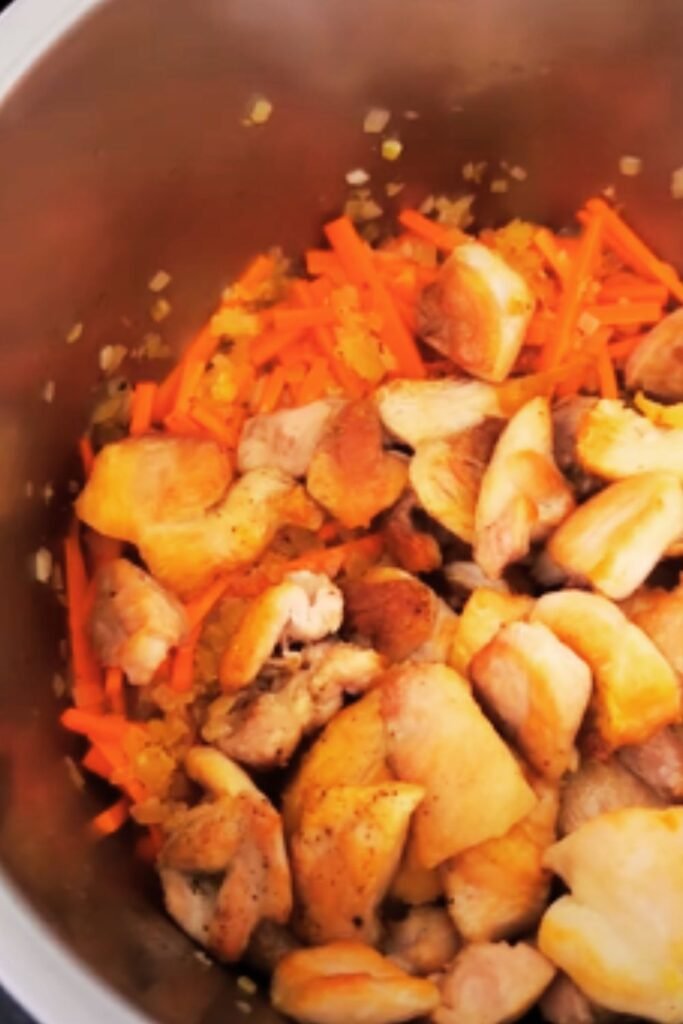
- Sauté the chicken: Set your Instant Pot to SAUTÉ mode and adjust to HIGH. Add 2 tablespoons of olive oil. Once hot (you’ll see the display read “HOT”), add the seasoned chicken thighs and brown for 2-3 minutes per side. You might need to work in batches to avoid overcrowding. Remove browned chicken to a plate and set aside.
- Sauté the aromatics: In the same pot, add the remaining tablespoon of olive oil. Add diced onions and sauté for 2 minutes until translucent. Add minced garlic and cook for another 30 seconds until fragrant, being careful not to burn it.
- Deglaze: Pour in the chicken broth, scraping the bottom of the pot with a wooden spoon to release any browned bits (this is flavor gold and prevents the dreaded “BURN” notice).
- Add seasonings: Stir in Italian seasoning, remaining paprika, onion powder, dried thyme, and red pepper flakes if using.
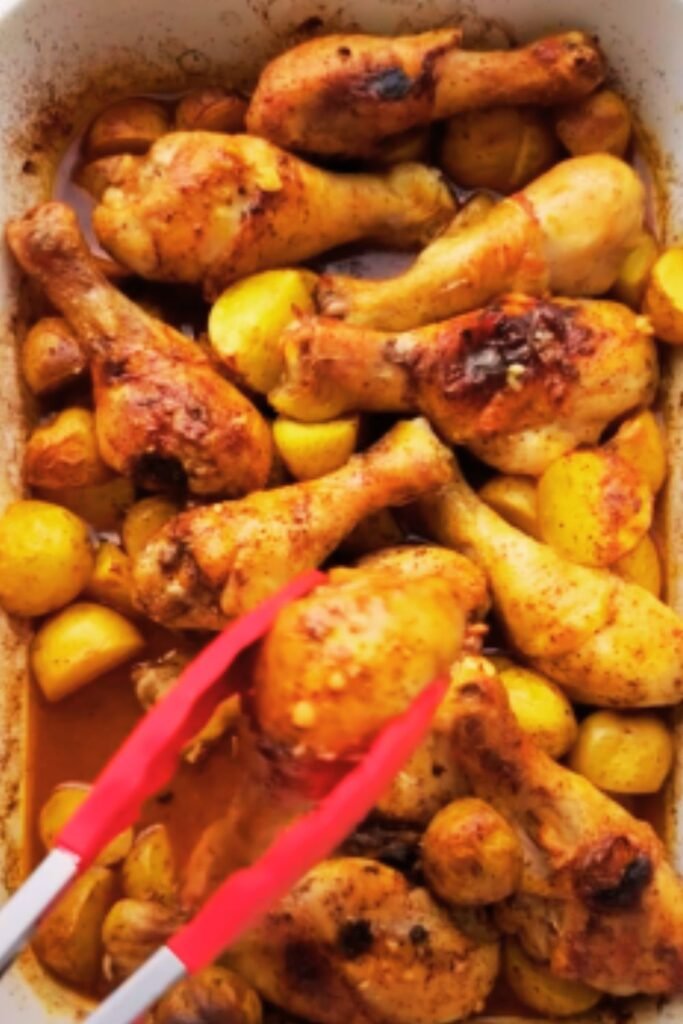
- Layer ingredients: Return the chicken to the pot. Arrange the potatoes (and optional carrots if using) around and over the chicken. Do not stir at this point.
- Pressure cook: Close the Instant Pot lid and set the valve to SEALING position. Select PRESSURE COOK (or MANUAL on older models) and set to HIGH pressure for 8 minutes. The pot will take approximately 10 minutes to come to pressure before the cooking time begins.
- Natural release: Once the cooking cycle is complete, allow a natural pressure release for 5 minutes, then carefully perform a quick release for any remaining pressure.
- Add finishing touches: Open the lid away from your face. If adding green beans, you can place them on top of the cooked contents, close the lid (no need to seal), and let them steam for 3-5 minutes from the residual heat.
- Final adjustments: Add butter and lemon juice. Taste and adjust seasonings if needed. Gently stir to incorporate everything while being careful not to break up the potatoes.
Texture and Doneness Guide
Knowing when your dish is perfectly cooked makes all the difference. Here’s what to look for:
| Component | Perfect Doneness | Undercooked Signs | Overcooked Signs |
|---|---|---|---|
| Chicken Thighs | Internal temperature of 165°F (74°C); meat easily shreds with a fork | Pink interior; tough texture | Dry, stringy texture |
| Chicken Breasts | Internal temperature of 165°F (74°C); slices easily | Pink interior; dense texture | Dry, crumbly texture |
| Baby Potatoes | Fork-tender but still holding shape | Resistance when pierced with a fork | Falling apart, mushy |
| Carrots (optional) | Tender-crisp | Hard, crunchy | Mushy, falling apart |
| Green Beans (optional) | Bright green, slight crunch | Too firm, raw taste | Dull green, limp |
Flavor Variations
One of the reasons I love this recipe is how versatile it is. Here are some of my favorite ways to switch things up:
Mediterranean Twist
- Add 1 cup halved cherry tomatoes
- Include 1/4 cup kalamata olives
- Sprinkle with 1/2 cup crumbled feta cheese after cooking
- Use oregano as the primary herb
- Finish with a drizzle of good olive oil
French Country Style
- Add 1 tablespoon Herbs de Provence instead of Italian seasoning
- Include 2 tablespoons Dijon mustard in the broth
- Add 1/2 cup white wine (reduce broth accordingly)
- Finish with a splash of heavy cream
- Garnish with fresh tarragon instead of parsley
Tex-Mex Variation
- Replace Italian seasoning with 2 teaspoons taco seasoning
- Add 1 diced bell pepper with the onions
- Include 1 can (15 oz) drained black beans
- Add 1 cup corn kernels
- Garnish with cilantro, lime juice, and avocado slices
Asian-Inspired
- Replace chicken broth with 3/4 cup chicken broth mixed with 1/4 cup soy sauce
- Add 1 tablespoon grated ginger with the garlic
- Include 1 tablespoon honey for sweetness
- Add 1 teaspoon Chinese five-spice powder
- Garnish with sliced green onions and sesame seeds
Nutritional Information
For those tracking their nutritional intake, here’s an approximate breakdown per serving (assuming 6 servings total):
| Nutrient | Amount per Serving |
|---|---|
| Calories | 385 |
| Protein | 35g |
| Carbohydrates | 22g |
| Fat | 18g |
| Fiber | 3g |
| Sodium | 520mg |
| Sugar | 2g |
| Calcium | 45mg |
| Iron | 2.5mg |
| Potassium | 720mg |
Note: Values may vary based on exact ingredients and proportions used.
Serving Suggestions
Transform this already delicious meal into a feast with these complementary sides and serving ideas:
- A crisp green salad with a light vinaigrette dressing
- Steamed broccoli or asparagus
- Warm crusty bread for sopping up the delicious sauce
- A simple cucumber and tomato salad
- Greek yogurt with a little garlic as a cooling side
- Fresh fruit for dessert to complete the meal
For special occasions, I sometimes serve this with:
- Roasted Brussels sprouts with balsamic glaze
- A colorful slaw with apple cider vinegar dressing
- Garlic sautéed spinach
- Fresh homemade applesauce
Storage and Reheating Tips
One of the things I appreciate most about this dish is how well it works as leftovers. Here’s how to make the most of them:
Refrigerator Storage
- Allow the dish to cool completely before refrigerating
- Store in airtight containers for up to 4 days
- Keep chicken and potatoes together—they’ll continue to share flavors!
Freezer Instructions
- This dish freezes well for up to 3 months
- Portion into individual servings before freezing for easier reheating
- Thaw overnight in the refrigerator before reheating
Reheating Methods
| Method | Instructions | Best For |
|---|---|---|
| Microwave | Heat on 70% power for 2 minutes, stir, then additional 30-second intervals until hot | Quick single servings |
| Oven | Cover with foil and heat at 325°F for 15-20 minutes | Preserving texture, larger portions |
| Stovetop | Reheat in skillet over medium-low heat with a splash of broth | Best texture, requires monitoring |
| Instant Pot | Use “Keep Warm” setting for 10-15 minutes | Gentle reheating, maintaining moisture |
Revitalizing Leftovers
To give leftover chicken and potatoes new life:
- Chop and add to a frittata or breakfast hash
- Shred the chicken and use in tacos or wraps
- Mix with additional vegetables and broth for a quick soup
- Create a quick casserole by topping with cheese and breadcrumbs, then broiling
Troubleshooting Common Issues
Even experienced cooks encounter challenges! Here’s how to handle the most common issues with this recipe:
“BURN” Notice on Instant Pot
- Solution: Ensure you properly deglazed the pot after browning the chicken. All browned bits must be scraped up before pressure cooking.
- Prevention: Add an additional 1/4 cup of broth if your Instant Pot tends to trigger this notice easily.
Undercooked Potatoes
- Solution: If potatoes aren’t tender after the cooking cycle, seal the pot again and pressure cook for an additional 2 minutes.
- Prevention: Cut potatoes to a consistent size, ideally no larger than 1.5 inches.
Dry Chicken
- Solution: Mix in a tablespoon of butter or a splash of broth to restore moisture.
- Prevention: Use chicken thighs instead of breasts, or reduce cooking time by 1 minute if using breasts.
Watery Sauce
- Solution: After cooking, remove chicken and potatoes, then use the SAUTÉ function to reduce the liquid for 3-5 minutes.
- Prevention: Start with slightly less broth (3/4 cup instead of 1 cup).
Bland Results
- Solution: Finish with an acid (lemon juice or vinegar), additional salt, and fresh herbs.
- Prevention: Season chicken generously before browning and don’t skip the sautéing steps.

Make-Ahead Options
Life gets busy, and I’m all about preparation that makes mealtimes easier. Here’s how to prep this dish ahead of time:
Complete Preparation (1-2 days ahead)
- Brown the chicken and sauté aromatics as directed
- Cool completely and store in the refrigerator
- When ready to cook, return to Instant Pot, add potatoes and proceed from step 5
Ingredient Prep (up to 3 days ahead)
- Cut and season chicken, store in airtight container
- Wash and cut potatoes, store submerged in water in the refrigerator
- Dice onions and mince garlic, store separately
- Measure out spices and combine in a small container
Freezer Meal Kit (up to 3 months)
- Place raw seasoned chicken in a freezer bag
- Separately bag the cut potatoes (blanch for 2 minutes in boiling water, then ice bath)
- Include a small bag with measured spices
- Freeze flat
- Thaw completely before cooking as directed, adding 1-2 minutes to pressure cooking time
Special Dietary Adaptations
I believe everyone should be able to enjoy a good meal regardless of dietary restrictions. Here’s how to modify this recipe for different needs:
Gluten-Free
- Already naturally gluten-free! Just ensure your chicken broth is certified gluten-free.
Dairy-Free
- Replace butter with olive oil or a plant-based butter alternative
- Skip any cheese in the variations
Low-Carb
- Replace potatoes with cauliflower florets or radishes (reduce pressure cooking time to 6 minutes)
- Add more non-starchy vegetables like bell peppers and zucchini
Paleo/Whole30
- Use ghee instead of butter
- Ensure your chicken broth is compliant
- Skip any legumes in the variations
- Use sweet potatoes instead of regular potatoes if preferred
Vegetarian Adaptation
- Replace chicken with 2 cans of drained chickpeas or 1 pound of extra-firm tofu (cut into 1-inch cubes)
- Use vegetable broth instead of chicken broth
- Reduce pressure cooking time to 4-5 minutes
- Consider adding mushrooms for an umami flavor boost
Frequently Asked Questions
Q: Can I use frozen chicken for this recipe?
A: Yes, you can use frozen chicken, but you’ll need to skip the browning step and increase the pressure cooking time to 12 minutes. Note that you won’t get the same depth of flavor without browning, but it will still be delicious.
Q: What if I don’t have an Instant Pot?
A: You can adapt this recipe for a slow cooker (cook on low for 6-7 hours or high for 3-4 hours) or Dutch oven (simmer covered on low heat for about 45 minutes, checking that potatoes are tender).
Q: Can I double this recipe?
A: Yes, but only if you have an 8-quart Instant Pot. Keep the cooking time the same, but be aware that it will take longer to come to pressure. Never fill your Instant Pot beyond the maximum fill line.
Q: My potatoes always end up mushy. What am I doing wrong?
A: Try using waxy potatoes like red or Yukon gold varieties, which hold their shape better. Also, make sure you’re not cutting them too small—aim for 1.5-inch pieces at minimum.
Q: Is it necessary to brown the chicken first?
A: While not strictly necessary for food safety, browning adds significant flavor to the final dish. If you’re short on time, you can skip this step and still have a tasty meal, but I highly recommend it for the best results.
Q: How can I make the sauce thicker?
A: After cooking, remove the chicken and potatoes, then select the SAUTÉ function. Mix 1 tablespoon cornstarch with 2 tablespoons cold water, then stir this slurry into the simmering liquid. Cook for 1-2 minutes until thickened.
Q: Can I use chicken drumsticks or bone-in thighs?
A: Yes! Bone-in pieces work wonderfully and often add more flavor. Increase the pressure cooking time to 10 minutes for bone-in pieces.
Q: What’s the minimum liquid needed for this recipe?
A: The Instant Pot requires at least 1 cup of liquid to come to pressure properly. The chicken will release some additional liquid during cooking.
Why This Recipe Works
As someone who’s tested countless Instant Pot recipes, I’ve discovered that the success of this dish comes down to a few key principles:
- Layering flavors: By sautéing ingredients before pressure cooking, we build a foundation of flavor that permeates the entire dish.
- Proper seasoning: Seasoning the chicken before browning and adding aromatics creates multiple dimensions of flavor.
- Optimal cooking time: The 8-minute pressure cooking time is carefully calibrated to cook both chicken and potatoes perfectly without either becoming overcooked.
- Strategic ingredient placement: Placing potatoes around and over the chicken ensures even cooking and allows the potatoes to absorb the savory chicken juices.
- Finishing touches: The addition of butter and lemon juice at the end brightens all the flavors and creates a silky sauce.
I hope this recipe becomes a favorite in your home as it has in mine. There’s nothing quite like the satisfaction of serving a delicious, home-cooked meal that took minimal effort and cleanup. Enjoy every bite!