There’s something magical about walking through your front door after a long day and being greeted by the rich, spicy aroma of homemade chili that’s been simmering away in your Crock-Pot. As someone who’s been perfecting my chili recipe for over a decade, I can confidently say that the slow cooker method delivers unmatched flavor development and convenience. Today, I’m sharing my ultimate Crock-Pot chili recipe that has won family cook-offs, potluck competitions, and most importantly, created countless moments of pure comfort around my dinner table.
Why Crock-Pot Chili Reigns Supreme
I’ve made chili every way imaginable—stovetop, pressure cooker, Dutch oven, and even over a campfire. But time after time, I return to my trusty Crock-Pot for the best results. Here’s why:
- Flavor Development: The low, slow cooking process allows all those complex flavors to meld together beautifully
- Texture Perfection: Tough cuts of meat become meltingly tender, and beans maintain their integrity without turning mushy
- Convenience Factor: The “set it and forget it” nature fits perfectly into busy schedules
- Entertaining Ease: Keeps the chili at the perfect serving temperature for hours during parties
I remember the first time I brought my Crock-Pot chili to my neighborhood block party. People were scraping the bottom of the pot and asking what my secret was. The truth? It wasn’t anything fancy—just the magic of time and temperature working together in that humble slow cooker.
Essential Ingredients: Building Blocks for the Perfect Chili
Before diving into the recipe, let’s talk about the components that create an exceptional chili. I’ve experimented endlessly with different combinations, and these are the non-negotiables for outstanding flavor:
| Ingredient Category | Options | Why It Matters |
|---|---|---|
| Meat | Ground beef (80/20), chuck roast, brisket, ground turkey, ground chicken, plant-based alternatives | Provides richness, protein, and body to the chili |
| Beans | Kidney beans, black beans, pinto beans, white beans, chickpeas | Adds texture, fiber, and heartiness |
| Aromatics | Onions, garlic, bell peppers, jalapeños, poblanos | Creates the flavor foundation |
| Tomato Base | Crushed tomatoes, diced tomatoes, tomato paste, tomato sauce | Provides acidity and richness |
| Spices | Chili powder, cumin, oregano, paprika, cayenne, cinnamon | Builds complexity and heat level |
| Liquid | Beef broth, chicken broth, vegetable broth, beer, coffee | Adds depth and controls consistency |
| Secret Ingredients | Cocoa powder, brown sugar, fish sauce, Worcestershire sauce, liquid smoke | Enhances umami and rounds out flavors |
I’ve found that choosing at least one item from each category ensures a well-balanced chili with depth and character. My personal combination is detailed in the recipe below, but consider this chart your permission to customize to your preferences!
Equipment: Setting Yourself Up for Success
While the recipe itself is straightforward, having the right equipment makes the process even smoother:
- Crock-Pot/Slow Cooker: A 6-quart size is ideal for this recipe
- Large Skillet: For browning meat and sautéing vegetables before transferring to the slow cooker
- Sharp Knife: For efficient prep work
- Wooden Spoon: For stirring and scraping up those flavorful browned bits
- Measuring Spoons/Cups: For accuracy with spices and liquids
- Ladle: For serving your masterpiece
The Ultimate Crock-Pot Chili Recipe
Now for the main event—the recipe that has earned me the title of “Chili Champion” among my friends and family. This recipe strikes the perfect balance between accessible ingredients and impressive flavor, making it suitable for both weeknight dinners and special occasions.
Ingredients:
- 2 lbs ground beef (80/20 lean-to-fat ratio)
- 1 large yellow onion, diced
- 1 red bell pepper, diced
- 1 green bell pepper, diced
- 4 garlic cloves, minced
- 2 jalapeños, seeds removed and minced (keep seeds for extra heat)
- 2 (15 oz) cans kidney beans, drained and rinsed
- 1 (15 oz) can black beans, drained and rinsed
- 1 (28 oz) can crushed tomatoes
- 1 (14.5 oz) can fire-roasted diced tomatoes
- 1 (6 oz) can tomato paste
- 2 cups beef broth
- 3 tablespoons chili powder
- 2 tablespoons ground cumin
- 1 tablespoon smoked paprika
- 2 teaspoons dried oregano
- 1 teaspoon cayenne pepper (adjust to your heat preference)
- 1 tablespoon brown sugar
- 1 tablespoon unsweetened cocoa powder
- 2 teaspoons Worcestershire sauce
- 2 bay leaves
- 2 teaspoons salt (plus more to taste)
- 1 teaspoon freshly ground black pepper
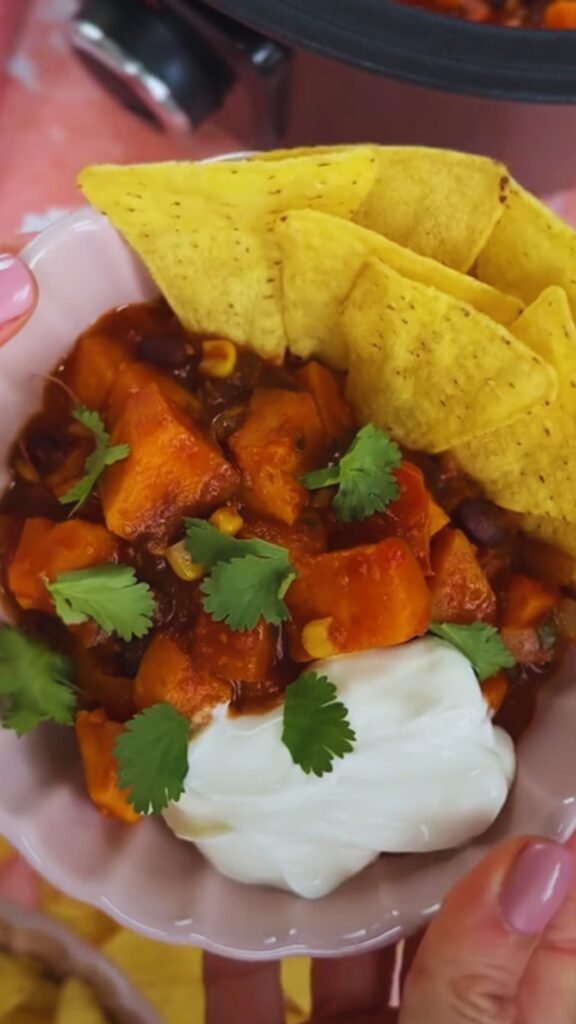
For Serving:
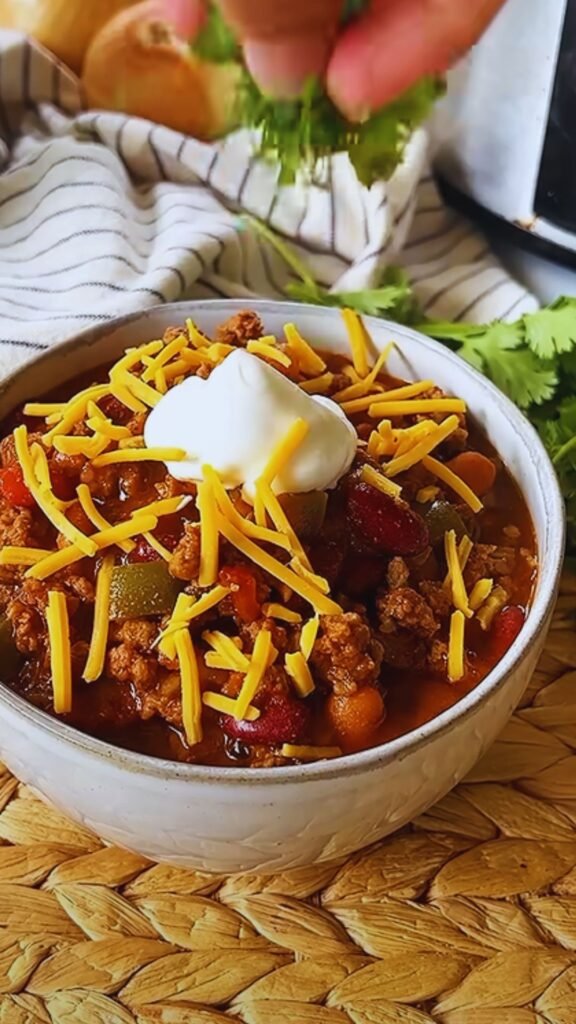
- Shredded cheddar cheese
- Sour cream
- Chopped green onions
- Diced avocado
- Fresh cilantro
- Lime wedges
- Corn chips or corn bread
Instructions:
- Brown the meat: In a large skillet over medium-high heat, brown the ground beef, breaking it into small pieces with a wooden spoon until no pink remains, about 7-8 minutes. Transfer to your Crock-Pot, leaving about 1 tablespoon of the rendered fat in the skillet.
- Sauté the aromatics: In the same skillet, add the diced onion, bell peppers, and jalapeños. Cook until vegetables are softened, about 5 minutes. Add the minced garlic and cook for another 30 seconds until fragrant. Transfer the vegetable mixture to the Crock-Pot.
- Add remaining ingredients: Add the kidney beans, black beans, crushed tomatoes, diced tomatoes, tomato paste, and beef broth to the Crock-Pot. Stir to combine.
- Add seasonings: Add the chili powder, cumin, smoked paprika, oregano, cayenne pepper, brown sugar, cocoa powder, Worcestershire sauce, bay leaves, salt, and pepper. Stir thoroughly to ensure everything is well incorporated.
- Cook low and slow: Cover and cook on LOW for 6-8 hours or on HIGH for 3-4 hours. The longer it cooks, the more the flavors will develop.
- Final adjustments: About 30 minutes before serving, taste and adjust the seasoning if needed. If the chili is too thick, add a bit more broth; if too thin, leave the lid off for the final 30 minutes of cooking to allow some liquid to evaporate.
- Serve: Remove the bay leaves. Ladle the chili into bowls and let everyone customize with their preferred toppings.
I’ve found that this chili tastes even better the next day, so don’t hesitate to make it ahead of time. It also freezes beautifully for up to 3 months, making it perfect for meal prep.
The Science Behind Great Chili: Why Each Step Matters
My journey to chili perfection has taught me that understanding the “why” behind cooking techniques makes a huge difference. Here’s a breakdown of what’s happening at each crucial step:
Why Brown the Meat?
Browning creates the Maillard reaction—a chemical process that develops hundreds of new flavor compounds. Skipping this step means missing out on a significant layer of flavor. I always take the time to brown in batches if necessary, never overcrowding the pan.
Why Sauté the Vegetables?
Raw vegetables added directly to the slow cooker will eventually soften, but they won’t develop the same sweet, complex flavors as when they’re sautéed first. This step caramelizes natural sugars and mellows the sharpness of onions and peppers.
Why Add Cocoa Powder?
This isn’t about making chocolate-flavored chili! A small amount of cocoa adds depth and complexity without any chocolate taste. It’s a technique borrowed from Mexican mole sauces, and it works wonders in chili too. The first time I tried this trick, I was amazed at how it rounded out all the flavors.
Why Cook So Long?
Time allows three important processes:
- Tough proteins break down into tender morsels
- Flavors meld and become more complex
- The texture thickens naturally as some liquid evaporates
Patience truly pays off when making exceptional chili.

Variations: Making This Recipe Your Own
While I stand by this recipe as written, cooking should be a personal expression. Here are some tried-and-true variations I’ve developed over the years:
Meat Variations:
- Beef Lovers: Replace ground beef with 2 lbs of chuck roast cut into 1-inch cubes for a more stew-like texture
- Poultry Option: Substitute ground turkey or chicken for a lighter version
- Mixed Meat Magic: Use 1 lb ground beef and 1 lb ground pork for a complex flavor profile
- Vegetarian Delight: Replace meat with an additional can of beans and 8 oz of mushrooms (sautéed until golden)
Bean Variations:
- Traditional Texan: Omit beans entirely and increase meat to 3 lbs
- Bean Bonanza: Use five different varieties of beans (1/2 can each) for interesting texture
- White Chili Twist: Substitute white beans for kidney/black beans and use ground chicken
Heat Level Adjustments:
- Mild: Omit cayenne and jalapeños
- Medium: Recipe as written
- Hot: Keep jalapeño seeds and increase cayenne to 2 teaspoons
- Fiery: Add 1-2 minced habanero peppers and 1/2 teaspoon ghost pepper powder (approach with caution!)
Regional Twists:
- Cincinnati Style: Add 1 teaspoon cinnamon, 1/2 teaspoon allspice, and serve over spaghetti
- New Mexico Variation: Replace some of the chili powder with ground dried New Mexico chiles and add diced green chiles
- Smoky Southern: Add 1/4 cup bourbon and 1 teaspoon liquid smoke
Troubleshooting: Common Chili Challenges Solved
Even experienced cooks encounter issues with chili. Here are solutions to the most common problems:
| Problem | Cause | Solution |
|---|---|---|
| Too Watery | Excess liquid, lid removed too frequently | Leave lid off for final 30-60 minutes of cooking; add 1-2 Tbsp cornmeal to thicken |
| Too Thick | Not enough liquid, cooked too long | Add beef broth 1/4 cup at a time until desired consistency |
| Too Spicy | Heavy hand with hot ingredients | Add 1 Tbsp brown sugar and 1/4 cup tomato sauce; serve with cooling toppings like sour cream |
| Too Mild | Insufficient seasoning | Add additional chili powder and cayenne 1/2 tsp at a time; incorporate hot sauce |
| Acidic/Tangy | Too much tomato, not enough balance | Add 1/2 tsp baking soda and 1 Tbsp brown sugar to neutralize |
| Bland | Insufficient salt, seasoning, or cooking time | Add salt 1/2 tsp at a time; boost umami with 1 Tbsp Worcestershire sauce; cook longer |
I once rescued an overly spicy batch by stirring in a dollop of peanut butter—sounds strange but worked amazingly well to balance the heat while adding richness!
Serving Suggestions: Creating the Complete Chili Experience
The beauty of chili lies not just in the pot but in how you serve it. Here are my favorite serving ideas that transform a simple bowl into a memorable meal:
Traditional Accompaniments:
- Freshly baked cornbread with honey butter
- Warm flour tortillas
- Saltine crackers or oyster crackers
- Corn chips for scooping or crumbling on top
Creative Serving Vessels:
- Hollowed-out bread bowls
- Over baked potatoes
- On top of hot dogs for chili dogs
- As a nacho topping
- Over rice or quinoa
- As a filling for stuffed bell peppers
Family-Style Serving Bar:
Set up a topping station with small bowls containing:
- Finely diced white onion
- Sliced avocado
- Pickled jalapeños
- Different cheeses (cheddar, Monterey Jack, cotija)
- Hot sauces of varying heat levels
- Fresh lime wedges
- Fritos or tortilla strips
- Chopped herbs (cilantro, green onions)
I love watching guests customize their bowls, and it’s a great conversation starter at parties!
Storing and Reheating: Making the Most of Leftovers
One of the best things about chili is how well it keeps. Here’s how to make the most of your leftovers:
Refrigerating:
- Cool completely before refrigerating (within 2 hours of cooking)
- Store in airtight containers for up to 5 days
- The flavor actually improves after a day or two in the refrigerator
Freezing:
- Portion into freezer-safe containers or heavy-duty freezer bags
- Leave about 1/2 inch of headspace to allow for expansion
- Label with date and contents
- Freeze for up to 3 months
- Thaw overnight in refrigerator before reheating
Reheating Methods:
- Stovetop: Place in saucepan over medium-low heat, stirring occasionally until heated through (add a splash of broth if too thick)
- Microwave: Heat in microwave-safe bowl in 1-minute intervals, stirring between each until hot
- Slow Cooker: Return to slow cooker on LOW for 1-2 hours until heated through (great for parties)
My favorite meal prep trick is to freeze individual portions in silicone muffin cups, then pop out the frozen chili “pucks” into a freezer bag. This way, I can grab exactly how much I need for a quick lunch!
Health Benefits: Nutritional Aspects of Chili
Beyond being delicious, chili is actually quite nutritious when made thoughtfully. Here’s a breakdown of the health benefits:
| Ingredient | Key Nutrients | Health Benefits |
|---|---|---|
| Lean Ground Beef | Protein, Iron, Zinc, B vitamins | Supports muscle growth, oxygen transport, immune function |
| Beans | Fiber, Protein, Folate, Magnesium | Promotes digestive health, stabilizes blood sugar, heart health |
| Tomatoes | Lycopene, Vitamin C, Potassium | Antioxidant protection, immune support, regulates blood pressure |
| Bell Peppers | Vitamins A, C, E, Potassium | Supports eye health, immune function, skin health |
| Onions & Garlic | Allicin, Quercetin, Sulfur compounds | Anti-inflammatory, immune-boosting, heart health |
| Spices | Various antioxidants | Anti-inflammatory, metabolism-boosting, digestive aid |
For those watching specific nutritional aspects, here are some easy modifications:
- Lower Sodium: Reduce salt, use low-sodium broth and no-salt-added tomatoes
- Lower Fat: Use 93% lean ground beef or turkey
- Higher Protein: Add an extra pound of meat or cup of beans
- Lower Carb: Reduce or eliminate beans, focus on meat and vegetables
My sister-in-law is a nutritionist, and she always praises my chili as a balanced one-pot meal, especially when topped with fresh vegetables like avocado and scallions.
Frequently Asked Questions
After sharing this recipe with countless friends and family members, I’ve collected the most common questions people ask:
Q: Do I really need to brown the meat before putting it in the Crock-Pot?
A: Yes, please don’t skip this step! Browning the meat adds tremendous flavor through the Maillard reaction. It also improves the texture of the final dish and allows you to drain excess fat before it goes into the chili.
Q: Can I put the meat in raw?
A: Technically yes, it will cook safely, but you’ll miss out on the flavor development and may end up with a greasier chili. The extra 10 minutes to brown the meat is worth it, I promise!
Q: Do I need to soak the beans first?
A: If you’re using canned beans as the recipe calls for, no soaking is needed—just drain and rinse them. If you want to use dried beans, you should soak them overnight first, and you may need to increase the cooking time.
Q: Can I make this in an Instant Pot instead?
A: Absolutely! Brown the meat using the sauté function, then add everything else. Cook on high pressure for 20 minutes with a natural release. You’ll lose some of the flavor development that comes with slow cooking, but it will still be delicious.
Q: My family doesn’t like spicy food. How can I adjust this?
A: Simply omit the cayenne pepper and jalapeños. The chili powder, cumin, and paprika will still provide plenty of flavor without heat. You can also look for mild chili powder specifically labeled as such.
Q: How can I thicken my chili if it’s too watery?
A: Remove the lid for the last 30-60 minutes of cooking to allow some liquid to evaporate. Alternatively, stir in 1-2 tablespoons of cornmeal, masa harina, or a slurry made with 1 tablespoon cornstarch mixed with 2 tablespoons cold water.
Q: Can I double the recipe?
A: Yes, as long as your Crock-Pot is large enough (8 quarts or larger). Cooking time remains the same, but you may need to brown the meat in several batches.
Q: What’s the deal with the cocoa powder? Will my chili taste like chocolate?
A: No, it won’t taste like chocolate at all! The small amount of cocoa powder adds depth and complexity to the flavor profile without any chocolate taste. It’s a traditional ingredient in Mexican mole sauces and works wonderfully in chili.
Q: Can I make this vegetarian?
A: Yes! Omit the meat and add an extra 2 cans of beans (variety of your choice) and 8 oz of mushrooms sautéed until golden. You could also add 1 cup of bulgur wheat or quinoa for texture. Use vegetable broth instead of beef broth and make sure your Worcestershire sauce is vegetarian (some contain anchovies).
Final Thoughts: Why This Recipe Stands the Test of Time
I’ve been making this Crock-Pot chili for more than a decade now, tweaking and perfecting it along the way. What makes it special isn’t any single ingredient but rather the harmony of flavors and textures that develop during the slow cooking process.
Every time I make this chili, I’m reminded of winter evenings with my family gathered around the table, game day celebrations with friends crowded in the living room, and quiet Sunday afternoons with leftovers that somehow taste even better the next day.
The beauty of this recipe lies in its flexibility—it can be dressed up for special occasions or simplified for busy weeknights. It nourishes body and soul, bringing people together around something universally comforting.
I hope this recipe finds a place in your regular rotation, and that you make it your own with personal touches and modifications. After all, the best recipes aren’t just followed—they’re passed down, shared, and adapted, becoming part of our culinary heritage.
Now, go preheat that skillet, gather your ingredients, and get ready to create a pot of chili that will have everyone asking for seconds!